How To Create A Landing Page with Hubspot | Best Landing Page Builder
A landing page goes by many names – lead capture page, squeeze page, whatever you want to call it.
It’s essentially a single web page with a single focus call to action (CTA) that allows you to capture the contact information of your visitors. The idea is to build an engaged email list.
In this HubSpot tutorial, you’ll learn how to create a landing page for free.
Why Use a Landing Page Builder?
If you wish to create user-friendly and intuitive landing pages without burning a hole in your pocket, then using free landing page builders is an ideal move.
Business owners can make use of HubSpot’s landing page templates and customize these templates based on their requirements.
Attractive landing pages (design and content) are key to converting visitors into leads.
The purpose of using a free landing page builder is to move a prospect down the sales funnel and finally convert, this is all part of the customer journey.
You don’t need to have coding experience to use a lander page builder like HubSpot. This tool offers a simple drag-and-drop builder which is super easy for beginners.
Moreover, the landing page feature is part of the HubSpot CRM that also offers other complementary marketing features.
You can watch our full HubSpot Tutorial for Beginners here.
How to Create Landing Pages for FREE with HubSpot
HubSpot is best for creating your landing pages at no cost.
So let’s learn how to create a landing page in HubSpot with the following steps:
1. Get Started with HubSpot Landing Page Builder
 First things first, sign up and login into your free HubSpot CRM. (Please note that this is an affiliate link which means we get a commission if you upgrade to a paid plan. It helps us continue to create educational content)
Alternatively, you can visit hubspot.com or click here and sign up for free.
If you’re new to the HubSpot CRM, we recommend watching this HubSpot tutorial to get the most out of this all-in-one CRM platform.
Also Read: Top 5 FREE Landing Page Builders
2. Create a Landing Page using HubSpot
 Did you know that you can capture up to one million contacts using HubSpot landing page builder and connect with unlimited users using HubSpot Free CRM?
The popular platform allows you to run and manage all your marketing activities in one place.
So, it’s about time you understand how to create a landing page for free using HubSpot.
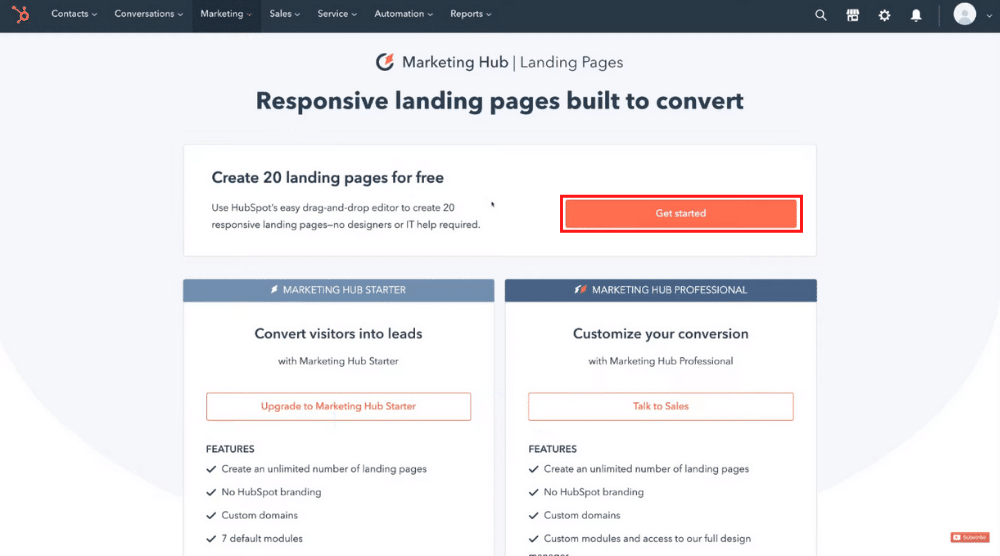
Once you gain access to your HubSpot dashboard after the initial sign-up, head over to ‘Marketing’ and select ‘Landing Pages’.
Using this free landing page builder, you can create up to 20 landing pages for free.
Click ‘Get started’ in the following step.
Select a Landing Page Template
 Now, choose one of the many mobile-friendly HubSpot landing page templates to start customizing it.
You can also preview any template (desktop and mobile) before deciding on the best template for you.
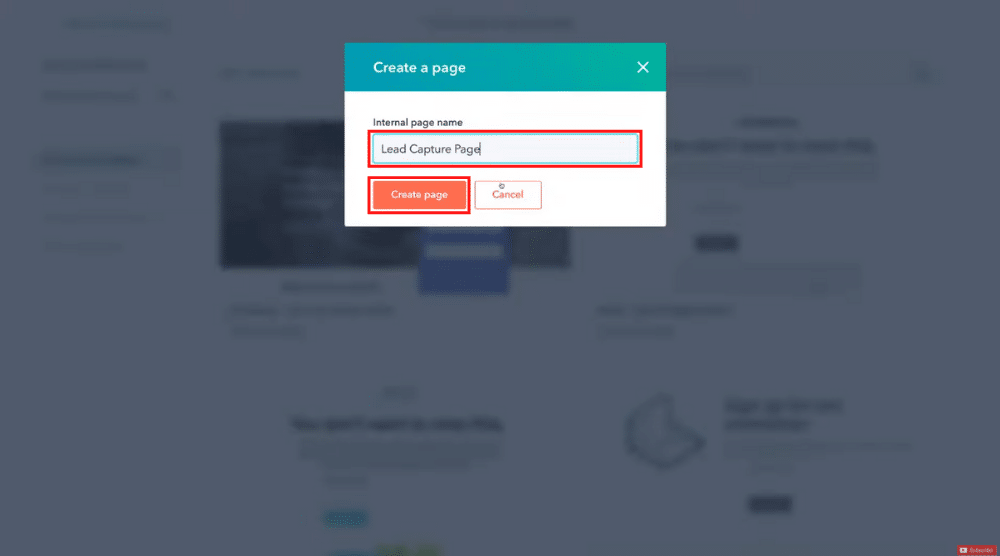
Once you finalize a template, give your landing page a name.
For this landing page tutorial for beginners, we’re going to name it ‘Lead Capture Page’ and click ‘Create page’.
Customize Your Landing Page
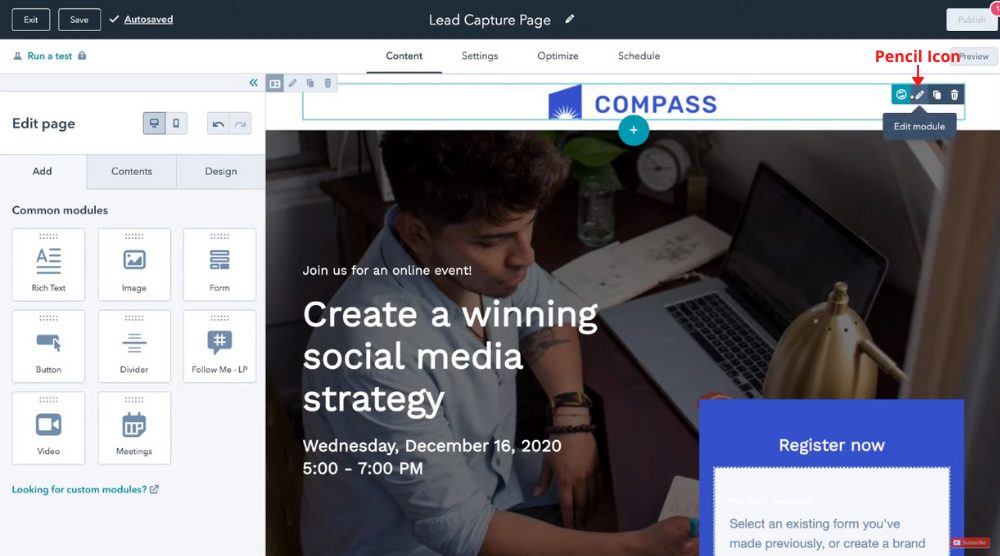 Using HubSpot’s drag-and-drop editor, you can start customizing the individual elements.
On your left are the block modules (image, form, video, button, etc.) that you can drag and drop on your landing page.
To change the logo, click on the pencil icon which represents ‘Edit module’.
On the left, select ‘Replace’ under ‘Logo’ and then select the logo of your choice.
Also Read: Canva Free Logo Maker
Edit the Content
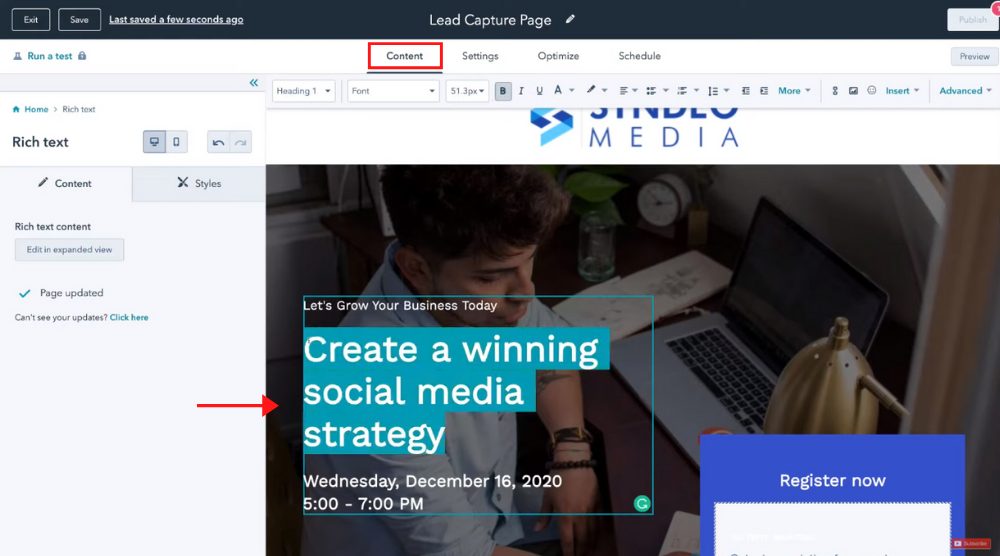 To edit the content on your HubSpot landing page, simply highlight the text you want to change and enter the new content.
Under ‘Content’ (top of the page), you’ll find some formatting options that will help you edit the content.
Add a Form Module
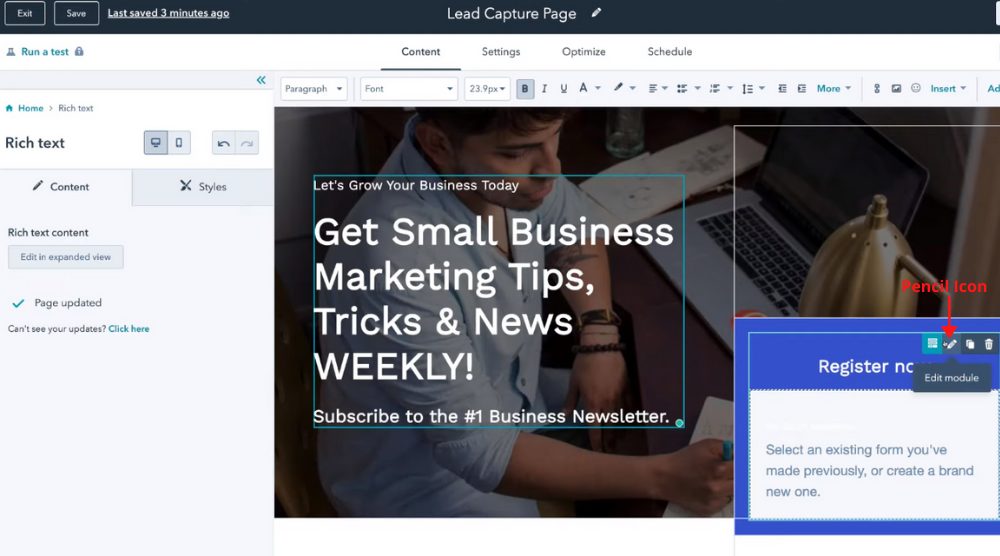 Similar to adding image and text modules, you can add a form module using HubSpot.
By clicking the pencil icon, you can then start editing the form on the left-hand side.
For starters, you want to change the form title. For this landing page tutorial, we’ll change it to – ‘Subscribe Now’.
If you have already created a form, simply choose a form type. If not, click ‘Create new form’.
In the next step, name your form module and click ‘Create’.
Now, you need to edit the form fields or add new ones if you like. Since we already have ‘Email’, we’re going to create another one by selecting ‘Add another form field’ and locating ‘First Name’ under ‘Choose a property’.
You may rearrange these fields by simply dragging and dropping them in the required order.
Visitors would thus be required to enter their email and first name while filling out your form.
Depending on the type of information you want to capture using this landing page builder, you can add more fields (phone number or company name, for example) or remove the existing ones if you like.
You can also make any field required or hidden.
All this information is going to be integrated with your HubSpot CRM. However, since we’re creating a subscriber form for this landing page tutorial, email and first name are sufficient.
If you scroll down to ‘Thank you’, you can decide what you want your visitors to see once they submit the form.
We’ll select ‘display an inline thank you message’. Below that, you can customize your ‘thank you’ message.
Under ‘Form options’, turn on the option that says “Always create a new contact for email address”. So, every time a visitor submits their information, that’s going to create a new contact in our CRM.
Edit the Modules
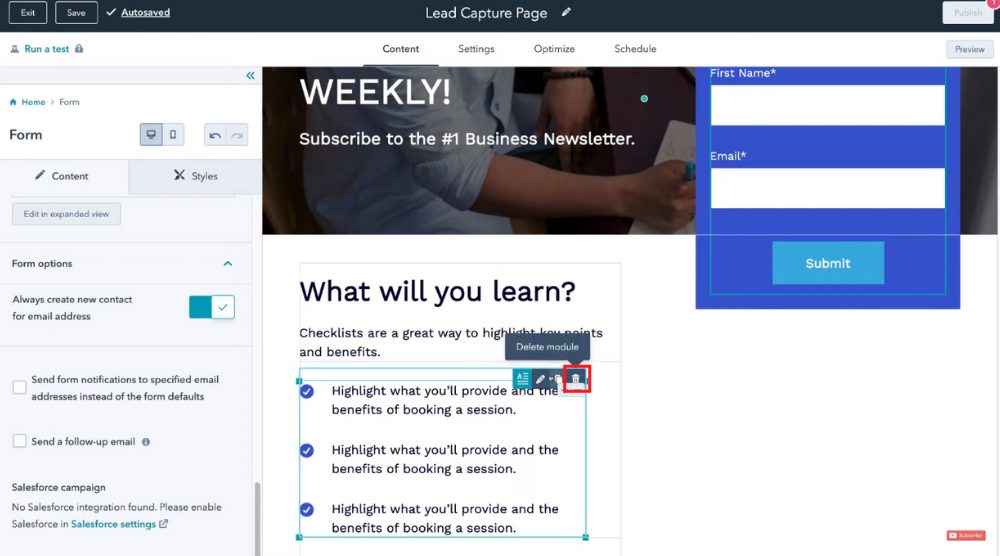 The HubSpot landing page builder also allows you to delete or duplicate a module or section if you like.
Using the same process of how we edited the form module, you can go ahead and edit the footer, social media, and text modules as well.
If you edit the social media module, for example, you will see the customization options on your left.
Here, you can add your Facebook, Linked In, Twitter URLs so that people visiting your website can also visit and follow your social media accounts.
You can also delete or add any social network that you want to display on your landing page.
Once you’re done customizing, click ‘Apply changes’. By now, you must have gotten the gist of how to make landing pages using the HubSpot landing page builder.
3. Landing Page Settings
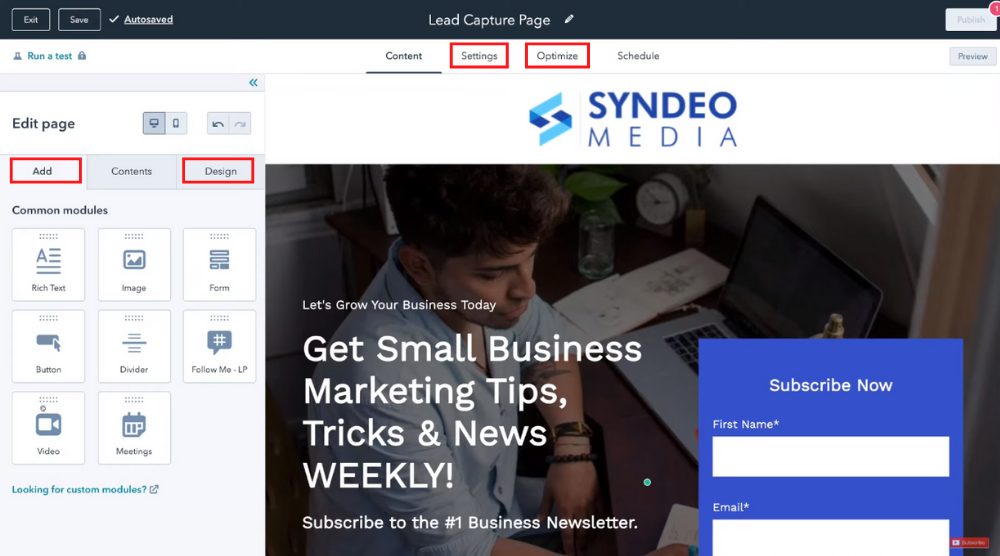 It’s time to explore some of the landing page settings in this landing page tutorial for beginners.
Under ‘Add’, you’ll find the module boxes that you can add to your landing page. You also have the preview button under the landing page settings.
If you head over to ‘Design’, you’ll notice the options to choose colors, typography, forms, and buttons based on your branding requirements.
Do remember to save the changes once you’ve customized the landing page.
On the top, you’ll find ‘Settings’ next to ‘Content’. This is where you can add a page title, custom domain (or use the branded one), and content slug (same as page title).
Copy and use this URL in your marketing campaigns, use this to send visitors to your landing page.
Next to ‘Settings’ we have ‘Optimize’.
This is where you’ll find more options (like meta descriptions for SEO) to further optimize your landing page.
4. Preview the Landing Page
 On your right, you’ll find a preview button below to ‘Publish’ under ‘Schedule’.
Here, you can preview what your landing page will look like on a mobile, tablet, or on desktop.
Each landing page created using the HubSpot landing page builder is already optimized for mobile devices.
5. Publish Your Landing Page
 On the top, you’ll find an option called ‘Schedule’.
Here, you can either publish the landing page now or schedule for later.
After the landing page is live, you’ll be able to see some basic metrics like page views, bounce rate, new customers, new contacts, total form submissions, time per page view, etc.
6. Test Your Landing Page
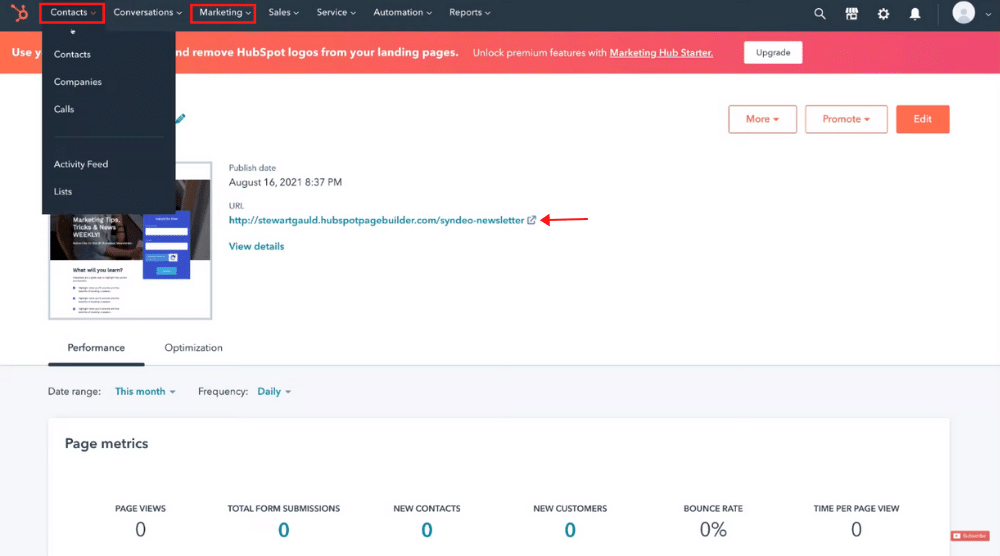 Navigate back to the top and click on the URL to view the landing page in your browser.
To test your newly created landing page, enter your first name and email on the form and submit the information.
You’ll get the thank you message created earlier. Now, head back to your HubSpot CRM dashboard, click ‘Contacts’ and ‘Contacts’ again.
Here, you can see that the visitor’s contact information (Your contact information that you just added) has been added under contacts.
Following this, you can engage in email marketing activities within your HubSpot CRM. Simply visit ‘Marketing’ and select ‘Email’ to begin.
Watch this HubSpot email marketing tutorial to understand the process in detail.
Alternatively, you can also connect to MailChimp, a powerful all-in-one email marketing and automation tool.
Read More: How To Use MailChimp

.png)


Comments
Post a Comment