Best WordPress Hosting for Small Business | Web Hosting for Beginners

Registered your domain name? Fantastic! (if not check out this post here)
What is the next step to make your site accessible to people when they browse the internet?
You guessed it – it’s finding the best WordPress hosting provider.
You need a hosting service that has all the services and tools to make your website come alive!
In simple words, your website needs a home – and it’s called a server.
Web hosting providers store your website data on their servers (special computers).
When you rent an office space, you have to think deeply about many factors, such as floor plan, location, security of the space, and rent.
Similarly, when buying a hosting plan, there are several things to consider, which can be daunting if you aren’t familiar with the hosting market.
But the good news is, we have the perfect WordPress hosting recommendation for you in this guide. And it’s called HostPapa.
HostPapa: Best WordPress Hosting for Small Business
It’s one of the best WordPress hosting providers in the market that’s easy to use and navigate through.
Not to mention, it has unparalleled 24/7 customer support chat service – a wonderful feature to have for beginners.
And HostPapa is incredibly affordable (we’ll talk about this when choosing a hosting plan)!
How to Use HostPapa?
Let’s go ahead and set up hosting for your WordPress website with HostPapa.
Step 1: Sign up & Select Your Hosting Plan
Visit the website of HostPapa.
 When you arrive at the landing page:
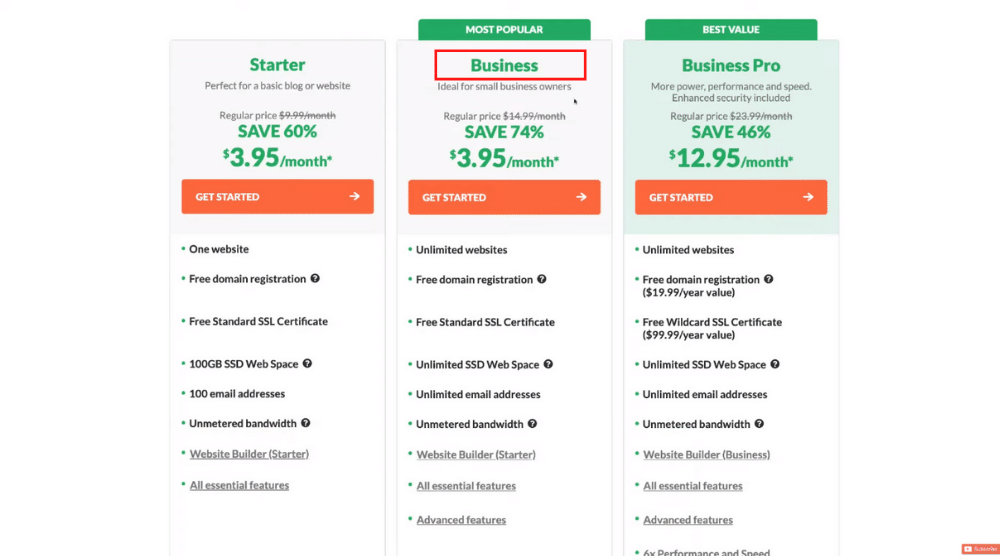
- Scroll down to find the hosting plans (prices may vary according to the country)
- Notice the ‘Business’ plan, which is ideal for small businesses. It offers features, such as unlimited websites, free domain registration, free SSL certificate (HTTPS, secure website), unlimited email addresses, unlimited bandwidth, and more
- If you haven’t registered your domain, you can get it for free under the business plan
- Hit ‘Get Started’
- Scroll down to ‘Order details’ and choose your billing term. We’ll choose ’12 months’ for this tutorial.
- Choose the server location (country you live in). We have the United States selected.
- We recommend keeping ‘Automation Website Backup’ selected. Due to malware, plugin/them/core update, or server downtime, your website can go down at any time. Hence, keeping a backup is non-negotiable.
- Notice the final order details on your right
- Click ‘Next Step’
Remember, these services can also be included later on.
Read More: Best Web Hosting for Small Business
Step 2: Add/Transfer Domain Name
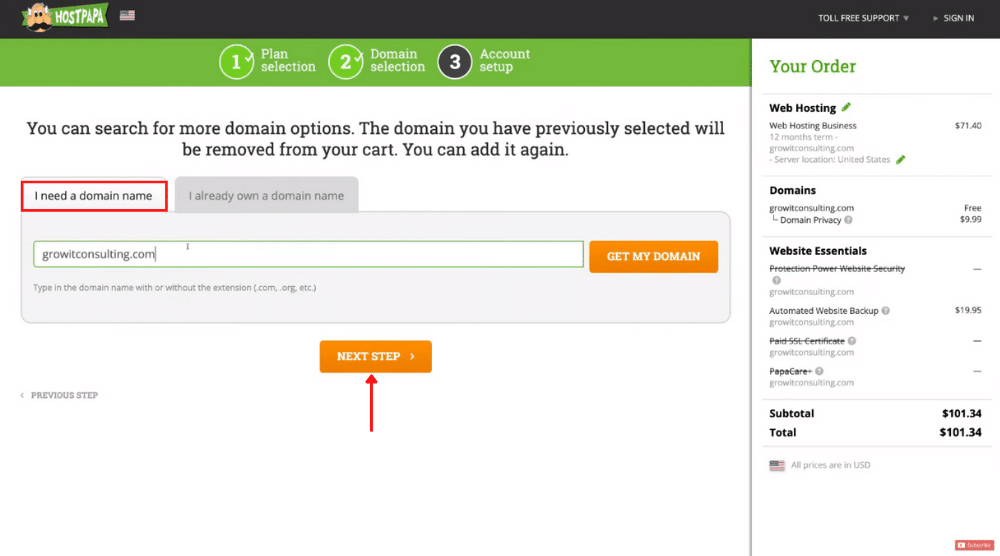 Choose “I already own a domain name” if you have one.
But for this tutorial, we’ll learn how to obtain a domain name using HostPapa.
Follow the steps below:
- Add a domain name under “I need a domain name”. Watch this tutorial if you want to learn how to choose a domain name for your small business.
- Click ‘Next Step’
- Fill up your account details to complete your order with HostPapa
After you’ve completed your order with HostPapa, head over to your email inbox (the one you used to sign up for HostPapa).
Open the welcome email and scroll down to find the link to your HostPapa dashboard, your client ID, and your password.
Remember to save this email.
Also Read : Create a Free Website with WordPress
Step 3: Explore Your HostPapa Dashboard
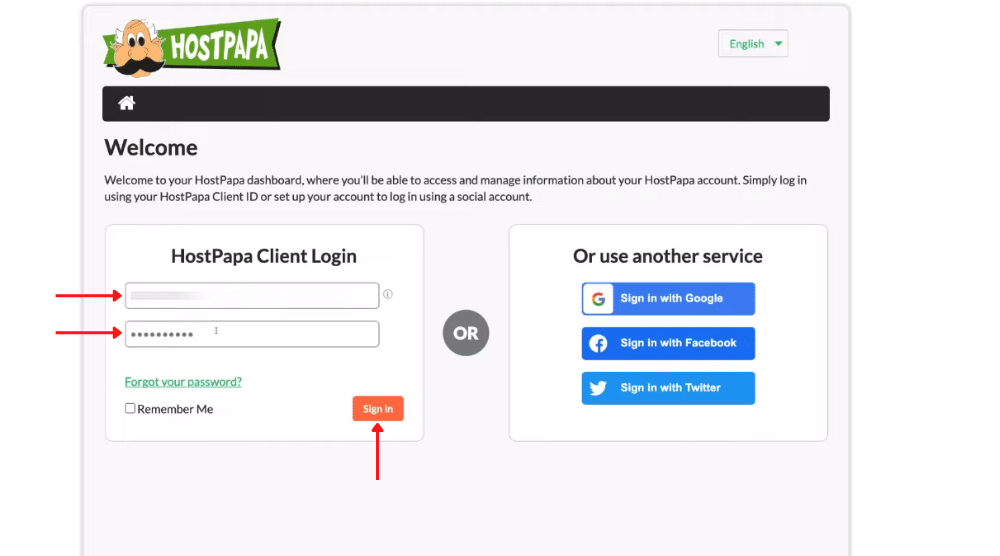 Log in with your ID and password to arrive at the HostPapa dashboard. Click ‘Sign In’.
Notice the chat option on your right that you can use to get in touch with a human customer service representative.
For example, if you want to discuss how to change your WordPress hosting provider, your support team can help!
They can even complete the domain transfer on your behalf. And, as mentioned, they are available 24/7.
Also Read: Best WordPress Theme for Beginners
Step 4: Install WordPress on Your cPanel
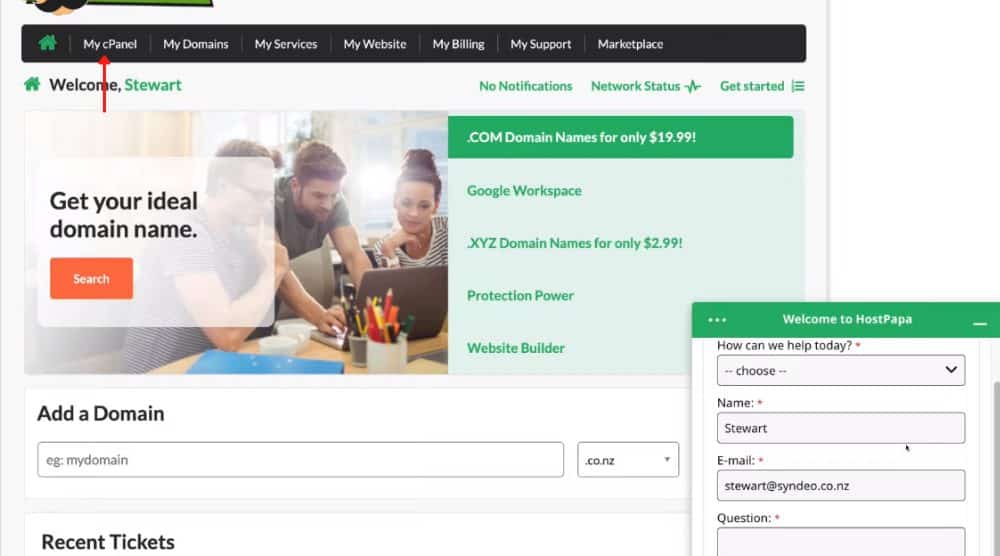 Follow the below-mentioned steps to install WordPress on your cPanel:
- Click on ‘My cPanel’ at the top (refer to the screengrab) to arrive at your cPanel
- Notice the general information on your right (primary domain, home directory, etc.)
- Scroll down to ‘Softaculous Apps Installer’
- Select ‘WordPress’
If you wish to create a premium WordPress website, watch this tutorial.
Read More: How To Make A Premium Small Business Website
.png)


Comments
Post a Comment