Create Your First YouTube Ads Campaign | YouTube Ads for Beginners

However, before we dive into the process, let’s understand the many advantages of advertising on YouTube.
How do you find a YouTube video to watch?
It’s most probably by typing your query in the YouTube search bar, clicking on the trending videos page, or the suggested videos.
Your homepage feed is filled with hundreds of thousands of videos that align with your interests.
But all of this requires a user to either intentionally search for a video or just stumble upon it.
As a business owner, you want to place your ads right where your prospects can find them.
Anyone can do this by learning how to create a YouTube ad through Google Ads.
Why Create YouTube Ad Campaigns?
A YouTube ads campaign allows you to reach your target audience by demographics, keywords, or topics so that you can position your videos in front of your audience.
Setting up a campaign takes just a few minutes (and we’ll show you how).
Moreover, you can measure the success of your YouTube ad campaigns by tracking the analytics, such as budget, costs, views, watch duration, most watched videos, and more.
How to Create a YouTube Ad Campaign?
To create a video ad campaign for YouTube, you need to have a Google Ads account.
If you are a complete beginner and are interested in learning more about Google Ads, then we recommend watching this tutorial first.
This video will also help you set up your Google Ads account.
Read More: What is Google Ads
Set Up Your Campaign: Level One
Once you are inside the Google Ads dashboard:
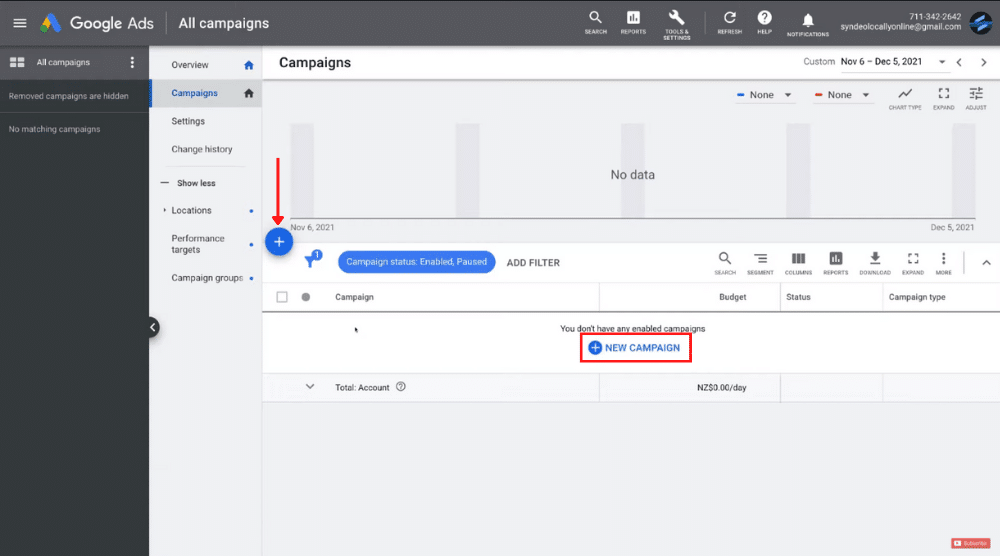
- Click on ‘Campaigns’ on the left. Since this is a fresh Google Ads account, we have zero campaigns at present (refer to the screengrab).
- Select either ‘New Campaign’ in the middle of your dashboard, or the ‘+’ icon on the left, and then click ‘New campaign’ to begin.
- Pick a goal for your first campaign. For this YouTube ads tutorial for beginners, we’ll choose “Create a campaign without a goal’s guidance”.
- Under the campaign type, select ‘Video’, and under the campaign subtype, select ‘Custom video campaign’. This is the most effective subtype. Click ‘Continue’.
Say (for our example) you offer a paid consultation service and want to create a video ad campaign for YouTube.
Therefore, we’ll name our campaign ‘Consulting Video’.
Under the campaign name, you have to select the bid strategy.
Step 1: Choose a Bidding Strategy
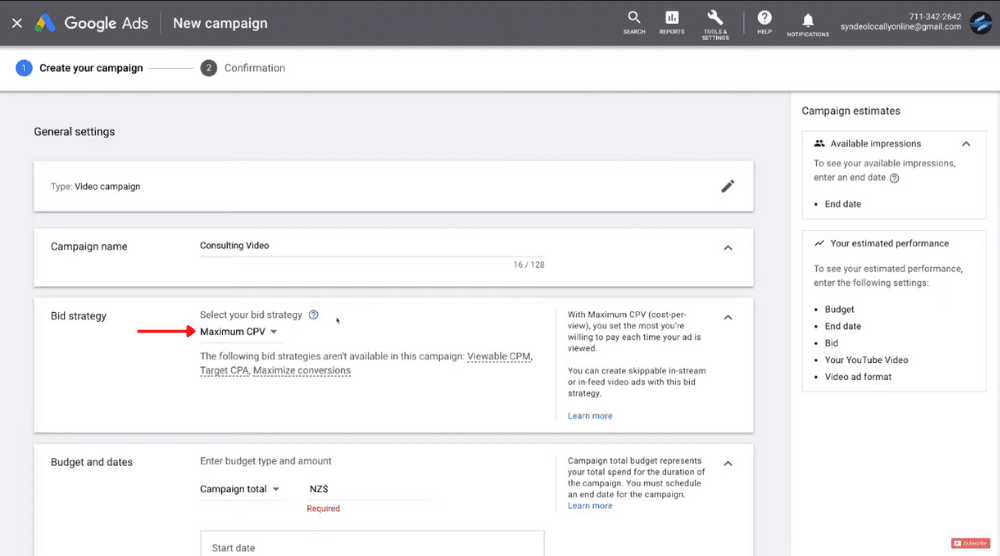 The most appropriate bidding strategy for beginners is the ‘Maximum CPV’ strategy (where CPV stands for cost-per-view; it means you’ll pay for each view of your video ad).
Since beginners don’t know their optimal CPV, this is the perfect bidding strategy to get started with.
Step 2: Fix a Daily Budget and Duration
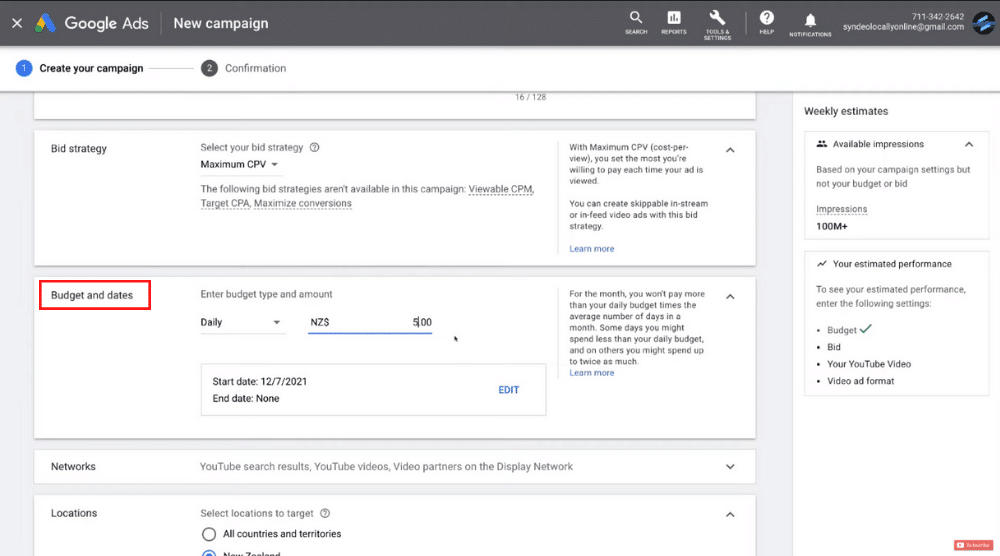
After choosing your bid strategy:
- Set ‘Daily’ as your budget type (instead of ‘Campaign total’)
- Enter your minimum daily spend next to it. We’ll set NZ$ 5 for the first campaign, also suitable for beginners. This budget can be increased at any stage during your campaign (more on that later).
- Set up a start date and end date for your campaign. If you find that the campaign isn’t working for you, it can be paused or deleted at any time. In this YouTube ads tutorial, notice we haven’t selected an end date (refer to the screengrab). However, this is up to you whether or not you want to add an end date.
Step 3: Pick a Network to Display Your Ads
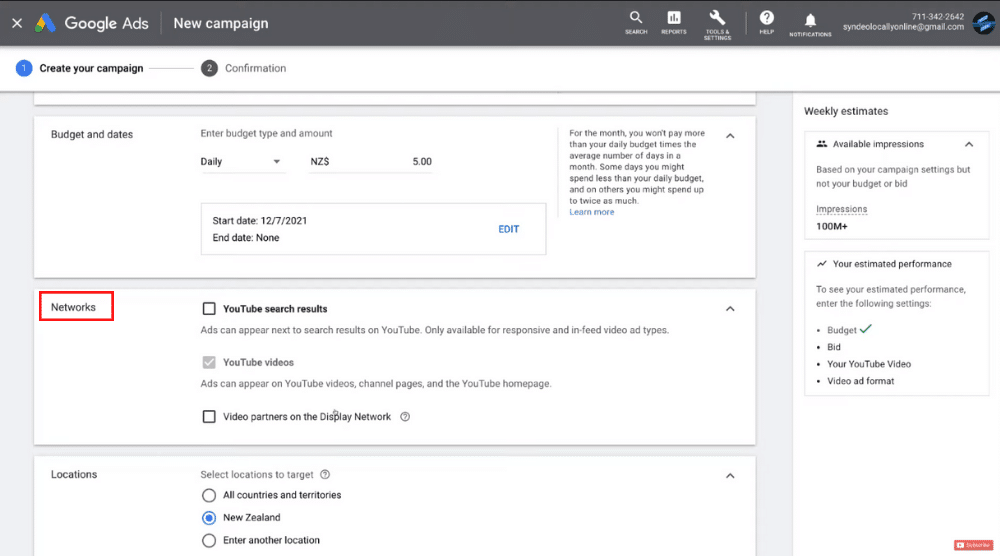 Under ‘Networks’, it’s recommended to turn off the ‘YouTube search results’ and ‘Video partners on the Display Network’ options (video partners are different sites and apps that will display your video).
We want our video ad to appear on YouTube videos, YouTube homepage, and channel pages.
If it was a YouTube video and we just wanted to drive more subscribers and views, then we would select the ‘YouTube search results’ check box.
However, since this is an ad we want our video to appear when our audience is watching their favorite videos.
We also want to drive people to our website, we’re just going to select ‘YouTube videos’.
That said, feel free to check all three options if you wish to maximize your reach.
Step 4: Select Locations & Languages for Your Campaign
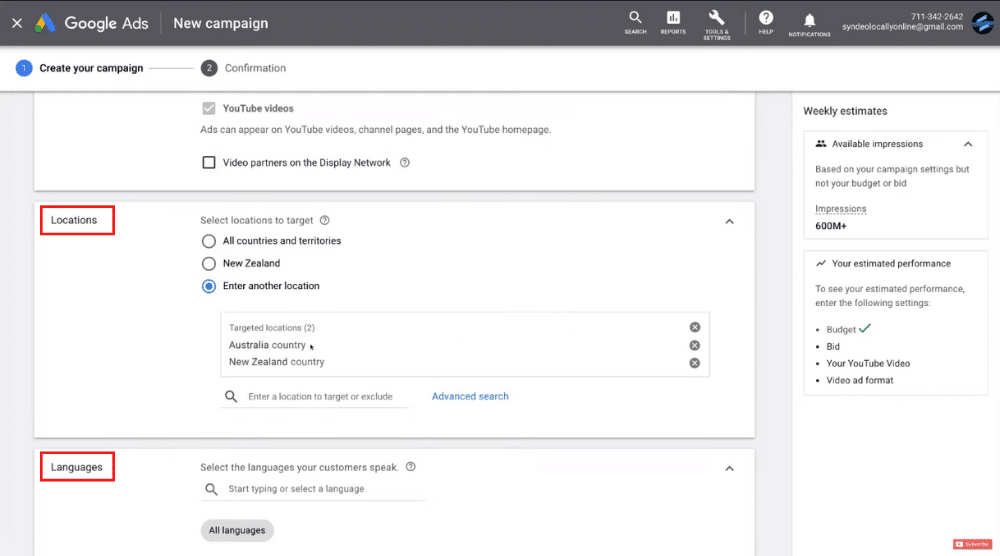 Next, choose the target locations that you want your video ad to show up.
In this YouTube ads tutorial for beginners, we’ve selected ‘New Zealand’.
To choose your preferred target location:
- Select ‘Enter another location’
- Type in your preferred region in the search bar and click ‘Target’. Similarly, you can add multiple regions, countries, cities, or areas. You can be as broad or specific as you like.
Below ‘Locations’, we also have ‘Languages’.
Depending on the languages that your target audience speaks, select appropriate languages. We’ve added ‘English’ for this tutorial.
Step 5: Must Check Content Exclusions
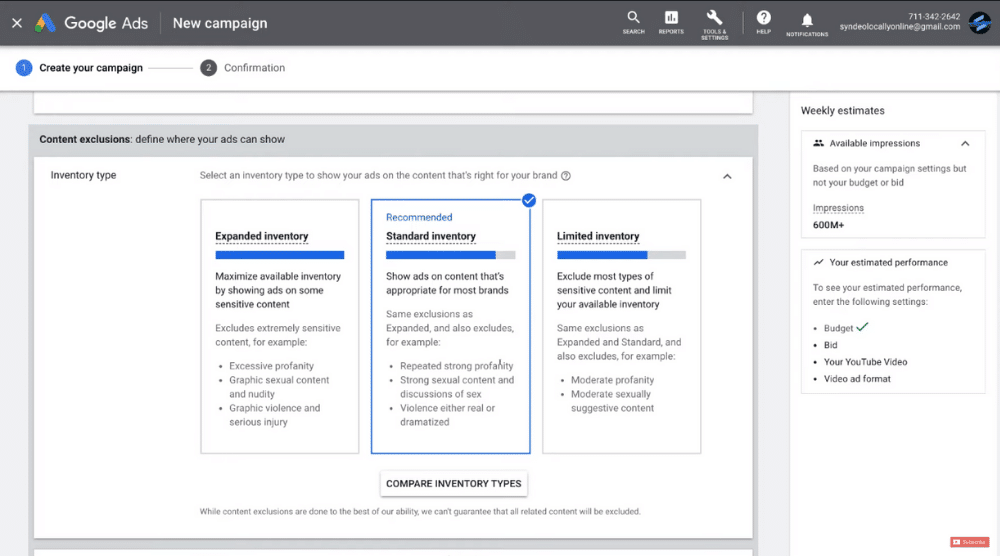 Below ‘Languages’, we have the ‘Content exclusions’ option.
This is where you choose the type of content that you feel is ‘appropriate’ for your brand to appear on.
Under ‘Inventory type’, we recommend keeping the ‘Standard Inventory’ category selected.
The exclusions under this category include:
- Repeated strong profanity
- Violence (dramatized or otherwise), and more
Basically, this means our video ad will not appear on this type of content.
We don’t need to make any changes to ‘Excluded types and labels’ below the content exclusions.
Next, we have the ‘Related videos’ section. This is more useful if you wish to promote your channel.
Here, you can add videos that are related to your YouTube ads to drive engagement.
We, however, will opt out of it in this YouTube ads tutorial for beginners.
What we want is to drive people to our website and encourage them to book a consultation.
Also Read: How to use Google Ads for Small Business
Create Your Ad Group: Level Two
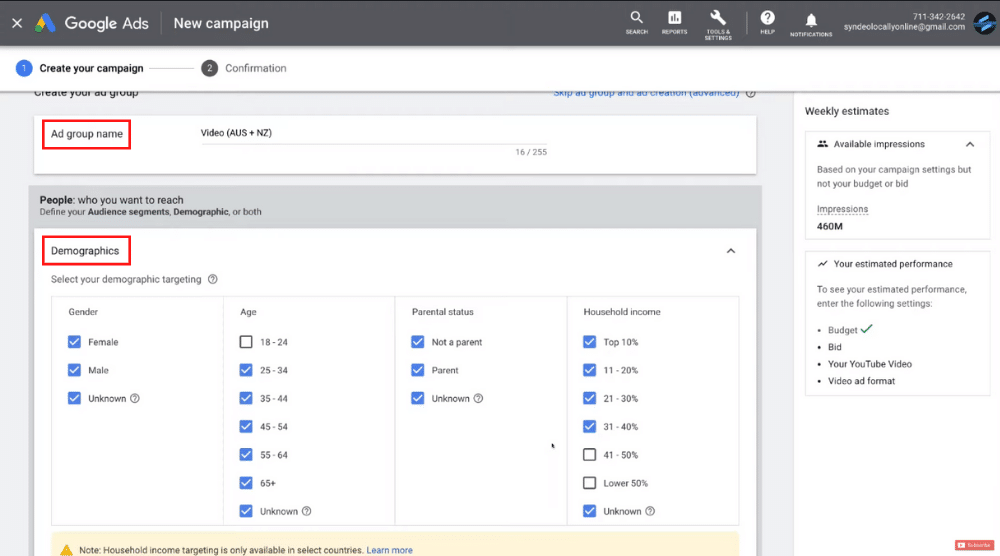
There are three levels to creating your campaign:
Campaign Level > Ad Group Level > Ad Level
We are at level two, i.e., the ad group level.
Now, follow the steps mentioned below:
- Name your ad group. We’re naming it ‘Video (AUS + NZ)’ for this tutorial since we’re targeting both New Zealand and Australia.
- Under ‘Demographics’, choose the age group(s), gender, parental status, and household income. (Refer to the screengrab) As a business owner that offers paid consultation, you might want to remove the 18-24 years age group and the lower household incomes.
- To choose your audience segments, click ‘Browse’ and select their interests and habits, for instance. Under ‘Who they are’, you may also choose their homeownership status and employment status. As mentioned before, you can get very specific and the same applies to demographics.
- Click on ‘Search’ and type in ‘business’ to select more categories that define your target audience. For example, we’ve selected ‘Starting a Business Soon’ and ‘Business Creation’. Feel free to check more options according to what suits your business.
Step 1: Narrow Your Reach by Content
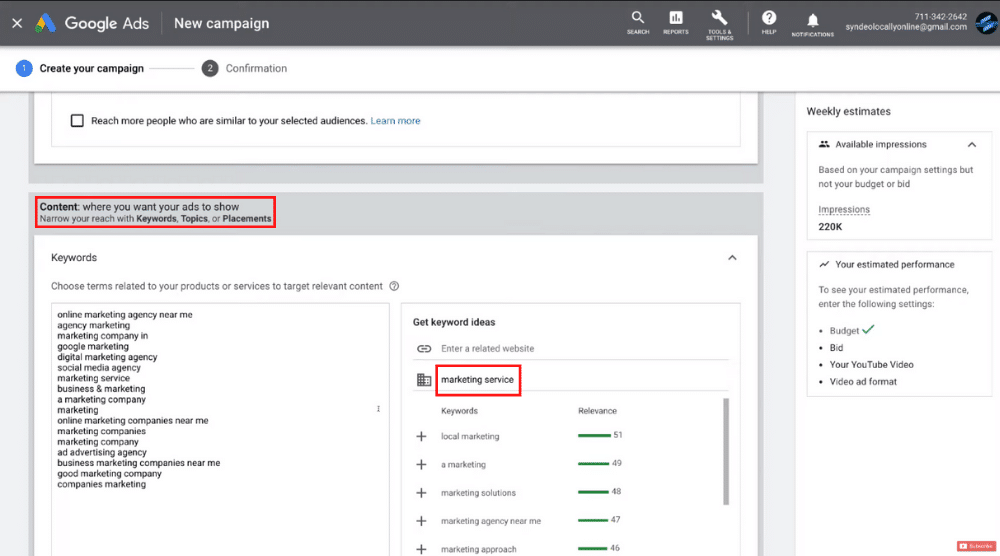 Once you’ve defined your target audience for this YouTube ads campaign, you need to narrow your reach according to topics, keywords, and placements. You can do so under ‘Content’.
In the ‘Enter your product or service’ field, enter ‘marketing service’ (for example) to generate keyword ideas (that your potential customers are typing in to find your business/products/services).
Add those keywords by clicking the ‘+’ icon.
Now, go on selecting the specific topics to display your ads on.
Under ‘Placements’, you may also choose particular YouTube channels, videos, websites, and apps where you want your YouTube ads to appear.
Step 2: Set Your Maximum CPV
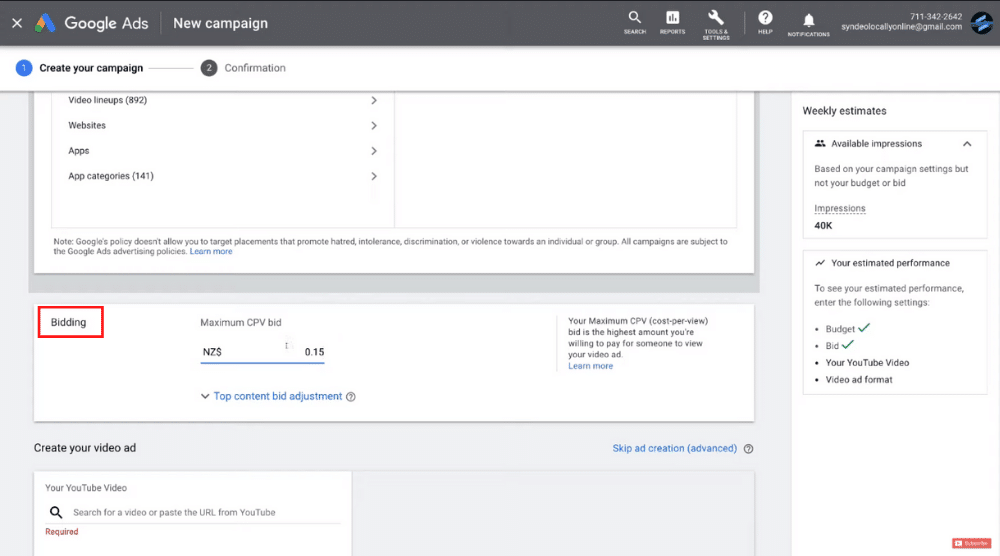 Next to ‘Bidding’, set your maximum CPV bid at $0.15. This is the highest amount you’re going to pay if someone views your YouTube ad.
The maximum CPV bid can be changed at any time.
As the campaign starts generating data, you can reduce this amount if you like.
Read More: How To Make Video Ads For FREE
Create Your Video Ad: Level Three
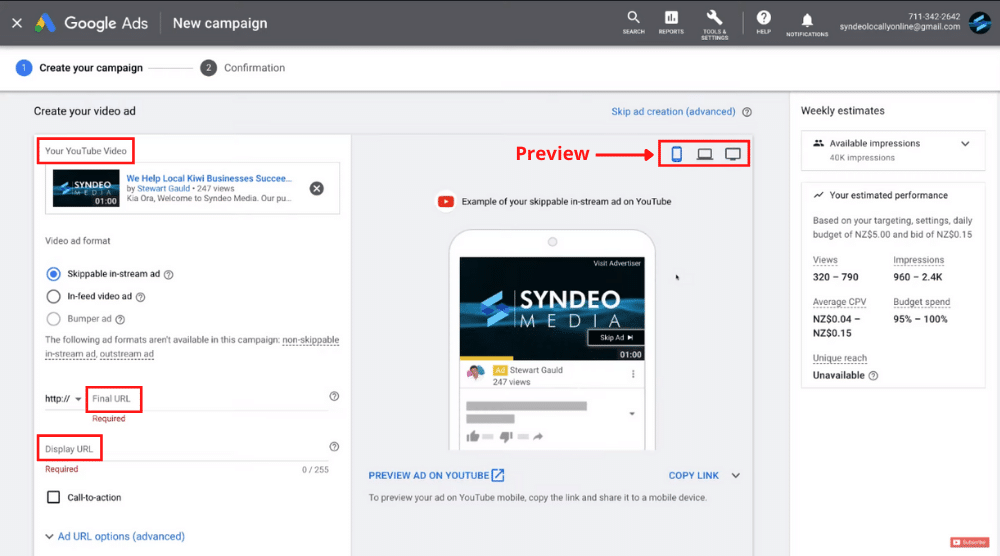 Head over to ‘Create your video ad’ below ‘Bidding’. This is where you want to add your YouTube video.
All you need to do is:
- Head over to your YouTube channel
- Find the video that’s suitable to use as an ad
- Copy the URL and add it to the required field (refer to the screengrab)
You’ll, of course, need to upload a video to your channel first.
If you’re not too sure about how to create professional business video ads, then we suggest watching this tutorial on How To Use InVideo.
Invideo allows you to create stunning videos in minutes! Get started for free here.
If you already have a YouTube channel, we recommend uploading your ad as an unlisted video.
That way the data generated through Google Ads isn’t going to affect your organic analytics on your YouTube channel.
Read More: BEST Video Editing Software for Beginners
Step 1: Select a Video Format
Now, after adding your video ad, select ‘Skippable in-stream ad’ under ‘Video ad format’.
This allows viewers to skip your ad after five seconds if they wish to.
This is the most common video ad format in use. On your right, you’ll be able to see a preview (for laptop, desktop, and mobile) of your YouTube ad.
Step 2: Enter the Final and Display URL
In the ‘Final URL’ field, add your website link, which will be the consultation page in our example.
Now, add the display URL which should preferably be shorter than the final URL, especially if the final URL is too long.
Step 3: Add a Call-to-Action, Headline, Ad Name
To entice people to actually click through to the URL, you need to add a call-to-action (CTA).
For this YouTube ads tutorial, we’re going to use ‘Book Now’ as our CTA.
But you may use any other CTA amongst the many options you can see here.
Add a compelling headline. If you don’t, your YouTube channel name will appear by default.
Under ‘Comparison banner’, select “Autogenerate using your channel banner”. Your YouTube channel banner will be displayed in your ad.
However, you also have the option to upload an image instead.
Now, type in your ad name and click ‘Create Campaign’ when you’re ready to launch it. Click ‘Continue to Campaign’ in the next step.
Read More: How To Create Videos
Head back to your Google Ads Dashboard
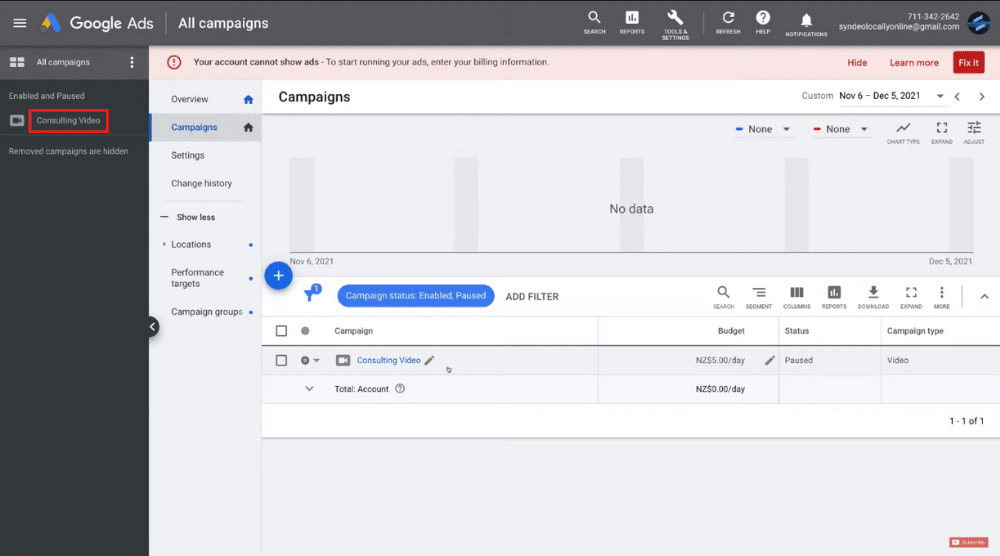 Back on your Google Ads dashboard, click on ‘Overview’ and then ‘All campaigns’.
This is where you can see your newly launched YouTube ads campaign.
See the green dot adjacent to your campaign name? Click on it.
This is where you can enable, pause, or remove your campaign. We will pause this campaign because we created it as an example for this YouTube ads tutorial.
Remember, you can make changes to your campaign at any time.
For example, click on ‘Consulting Video’ on your left-hand side.
Now, click on your ad group ‘Video (AUS + NZ)’ to see your newly created ad on your right. Notice the Max CPV at the top.
If you need to change it, simply click on the pencil icon > enter the new value > hit Save.
With this, we conclude our YouTube ads tutorial for beginners. You are now ready to advertise on YouTube!
Also Read: Google ads tutorial for beginners
.png)


Comments
Post a Comment