Zoho Projects | Online Project Management Software (Beginners Guide)

Zoho is a leading all-in-one business suite and cloud-based software with integrated customer relationship management (CRM) business emails, email marketing, collaboration, customer service, accounting software, and more.
These tools and important activities help your small business grow and succeed online.
Each of Zoho’s products interacts with each other.
Zoho offers small teams a completely free plan, which allows you to leverage core business activities without having to blow the budget.
The focus of today’s guide is on Zoho Projects.
This online project management software is ideal for both basic and complex project management requirements.
Zoho Projects: Best Online Project Management Software
In this Zoho Projects tutorial, you’re going to learn how to use Zoho Projects and thus manage, streamline, and enhance your project workflows.
Thanks to its user-friendly interface, beginners will find it enjoyable and easy to use.
How to Use Zoho Projects?
This detailed guide will help you to get started with Zoho projects, use it efficiently and explore its unique features. So, lets get dive into it!
Step 1: Visit Zoho Projects
 Get started with Zoho Projects for FREE here
*The link above is an affiliate link, which means we will get a commission if you upgrade to a paid plan (with no extra cost to you). This helps support our education based website and we thank you in advance!
Once you arrive at Zoho Projects, follow these steps to begin:
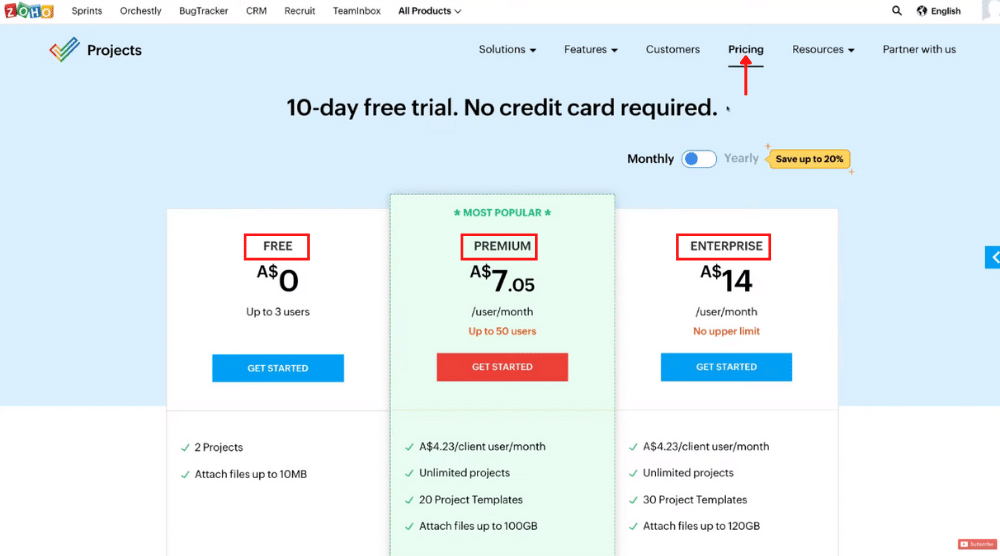
- To explore the Zoho Projects pricing, point your cursor to ‘Pricing’ on the menu bar and click on it.
- Notice the three pricing plans: Free, Premium (at $7.05 per user, per month), and Enterprise (at $14 per user, per month).
Also Read: How To Use Zoho Mail
Step 2: Choose a Pricing Plan
 Observe that each plan has its unique advantages.
While the free plan doesn’t cost you anything, it does have its limitations.
Only three users can access it for free and the file attachment is capped at 10 MB.
That said, small businesses and individuals should find it sufficient.
It’s a wonderful opportunity to get started with your project management activities.
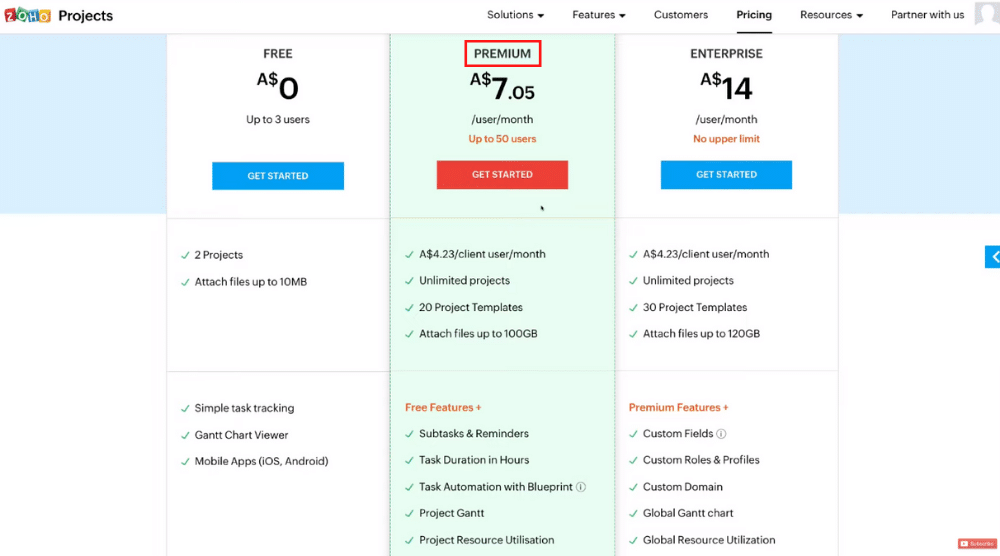
For this Zoho Projects tutorial, however, we’ll go ahead with the Premium plan.
Using it, you can attach 100 GB worth of files, access 20 project templates, create and manage unlimited projects.
Since we’re going to cover these features in this guide, we’ve opted for the Premium plan.
Remember, you do get a 10-day free trial.
Click the ‘Get Started’ button under the Premium plan.
Now, follow the step-by-step process as guided by Zoho Projects to complete your sign-up.
Once you do that, you’ll arrive at the Zoho Projects dashboard.
Step 3: Set Up Your Account
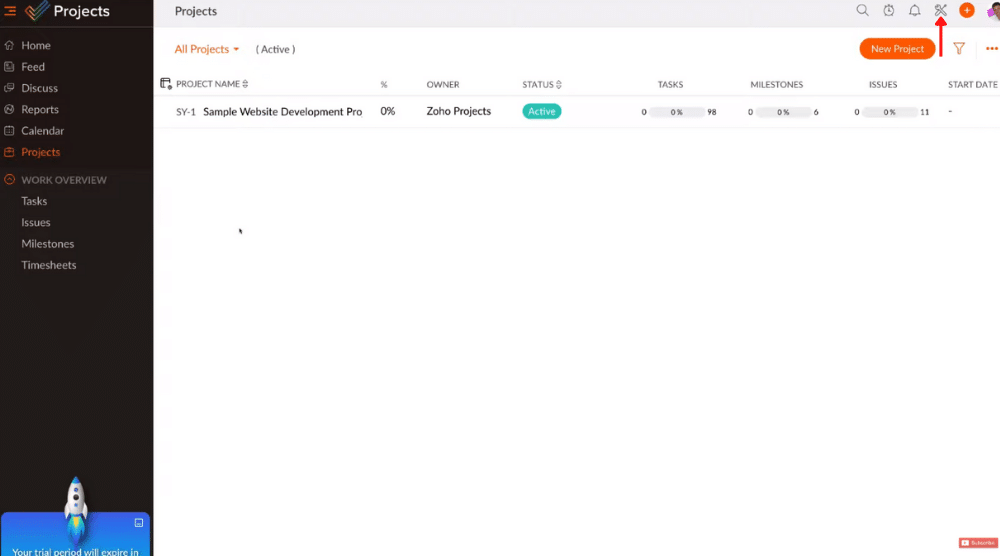 Inside your fresh Zoho Projects account, notice the trial period widget in the bottom-left corner.
You can upgrade at any time by clicking ‘Upgrade Now’.
If you decide not to, you’ll be automatically downgraded to the free plan.
Now, follow these steps to complete the initial setup:
- Navigate to your top-right corner and select ‘Setup’ (refer to the screengrab)
- Start customizing your account under the ‘Personal Settings’ tab. For instance, you may choose the most used module under the ‘Landing Page’ section. Every time you log in, you’ll land on this module (Home, Feed, Projects, Reports, Calendar, and Discuss).
- Click ‘Update’ after selecting the module
- Under ‘Configurations’, you can set up and verify your email, change your portal URL
- For this Zoho Projects tutorial, we’ll keep the default settings on for Date & Time Settings, Project & Budget, Task & Timesheet. However, you may change those based on your account requirements.
Step 4: Create Zoho Project Templates
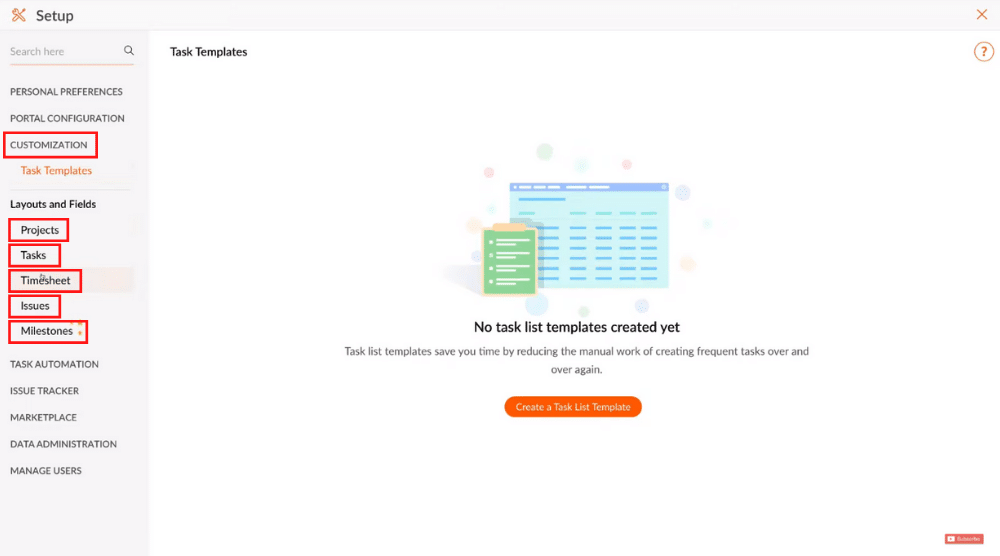 Under the ‘Customization’ tab is where you can create Zoho Projects templates for tasks, projects, timesheets, issues, and milestones.
Think about the time you could save by not doing this from scratch every time you need to create a similar new project, task, or workflow.
As far as task automation and issue tracker features are concerned (see the navigational panel on the left), they will be discussed in a more advanced tutorial.
Step 5: Leverage Marketplace / App Integrations
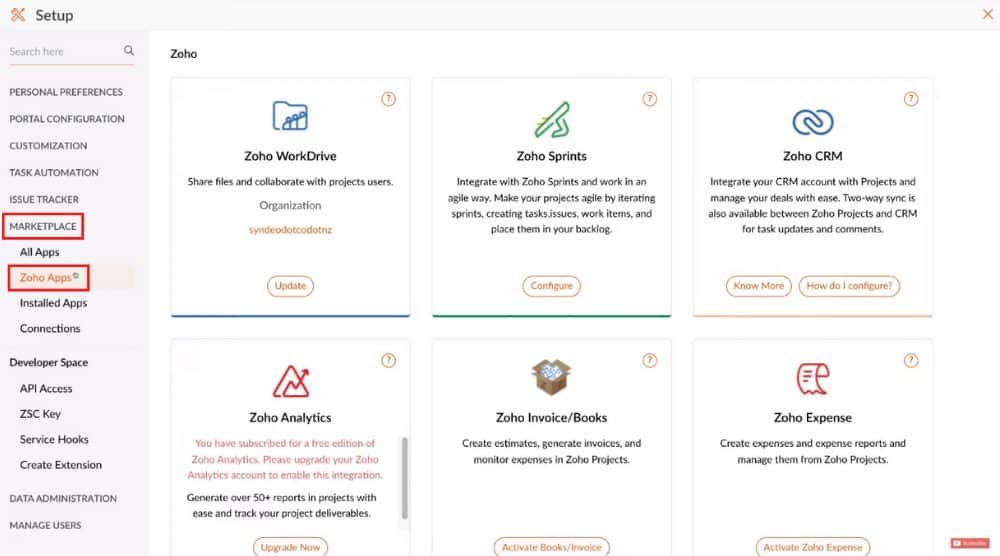 Below ‘Issue Tracker’, we have ‘Marketplace’.
This is where you can integrate important apps with your Zoho Projects account.
If you click on ‘Zoho Apps’ (see the menu on the left), you’ll find all the other Zoho Projects integrations as well.
Owing to these dynamic integrations, Zoho Projects has become a renowned project management software for small businesses.
Step 6: Add Users
 Point your cursor to ‘Manage Users’ on the left and click on it.
Select ‘Portal Users’ to start adding users to Zoho Projects.
It’s that easy to collaborate with your teammates on this online project management software.
If you wish to add your clients too, you can do that under ‘Client Users’.
Remember, they have limited permissions on your account.
Apart from that, you can also manage teams, profiles, and roles.
Before continuing with this tutorial, start adding a few users to collaborate on projects with by clicking the ‘Add User’ button in the top-right corner.
You can now exit out of this setup by clicking the ‘X’ button in the upper-right corner.
Again, in the far-right corner, you’ll find your profile section.
This is where you can see your subscription details and change your pricing plan.
Below that, you’ll notice basic appearance settings such as themes and night mode.
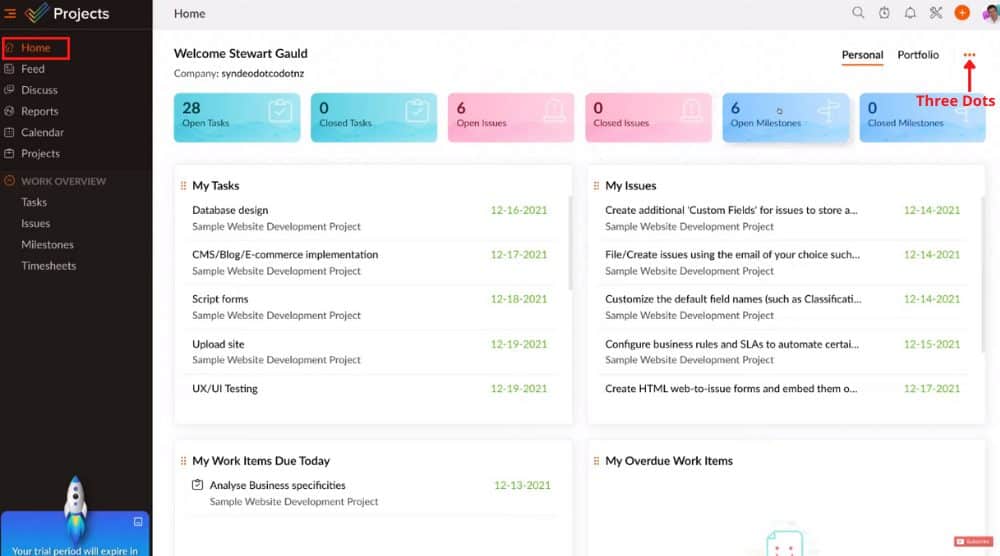
Step 7: Know Your Dashboard
 It’s time to familiarize yourself with the Zoho Projects dashboard.
- By clicking on ‘Home’ (see left-hand side menu), you’ll be able to see a snapshot of your activities, such as open tasks, closed tasks, open issues, closed issues, open milestones, and closed milestones.
- The widgets can be customized by clicking the three dots in the upper-right corner.
- Below ‘Home’, you’ll find ‘Feed’. This is the place to start a discussion with your team on Zoho Projects.
- To find updates from different people, you visit ‘Status’ next to ‘Feed’.
- To see the timeline of activities happening in your Zoho Projects account, click on ‘Activity Stream’ next to ‘Status’ (refer to the screengrab).
- When you need to converse with your entire team, head over to ‘Discuss’ on the left-hand side navigation panel.
- Under ‘Reports’ (below ‘Discuss’) is where you can view various reports related to your projects, milestones, task lists, tasks, and subtasks (more on that shortly).
- Select ‘Gantt Chart’ and pick a reporting type that you wish to review
- Just above your Gantt Chart, click on ‘Add Task’ or the drop-down arrow to select ‘Add Task List’ instead.
- If you wish to see a calendar representation of your projects, click on ‘Calendar’ below ‘Reports’
- To view your projects dashboard, select ‘Projects’ below ‘Calendar’. This is where you can create, view, and manage all your projects within this online project management software.
- Under ‘Work Overview’ (see the menu again), you’ll find tasks, issues, milestones, and timesheets
If you click on ‘Tasks’, you’ll notice that the Kanban view is selected by default.
Click on it to switch modes. If you select ‘Classic’, it will display a list of all your activities.
On the other hand, if you select ‘Plain’, it will show you a list of tasks instead.
We prefer the Kanban view since it’s the most appropriate visual representation of our workflows.
Similarly, you can select the view type for ‘Issues’ as well.
Milestones, on the other hand, are basically sequences in your project timeline that you need to complete to close your project.
Using this project management software for small businesses, you can also manage your invoices, expenses, forums, feeds, documents, and pages.
These additional modules work towards further enhancing the collaboration between your teams.
However, we’re not going to cover these modules in this Zoho Projects tutorial.
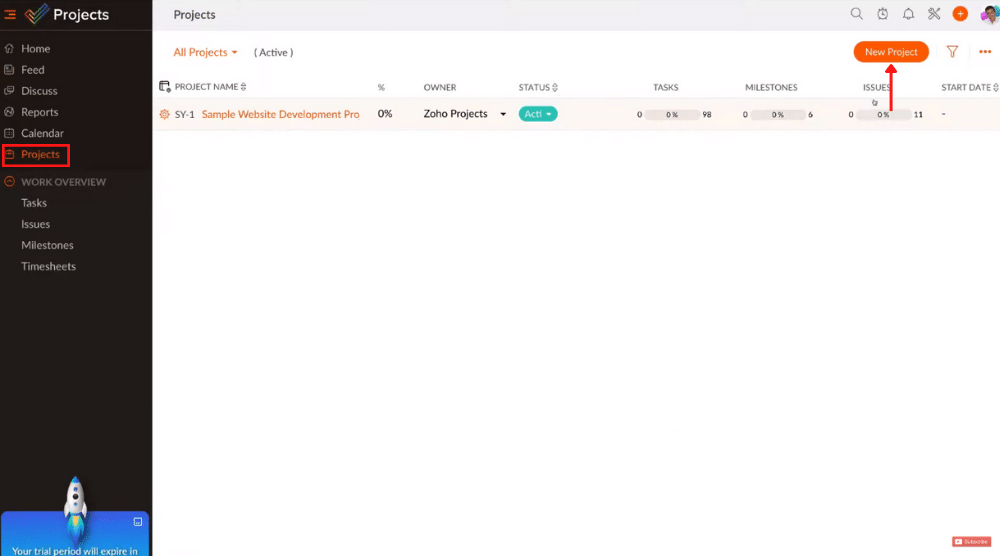
Step 8: Create a Project
 Before you create your first project, it’s important to understand the Zoho Project structure, which looks like this: Project > Milestones > Task Lists > Tasks > Subtasks
To create a project:
- Tap on ‘Projects’ seen on the left-hand side navigation menu
- Select ‘New Project’ in the upper-right corner
- Fill in the required details, such as project title, owner, start date, end date, overview, template, task layout, group name, tags, customized tabs, etc.
- Choose the project access – ‘private’ if only project users can access it and ‘public’ if clients require access. Remember, they can only follow, view, and comment whereas project users have complete access.
- We’ll select ‘Private’ for this Zoho Projects tutorial and click ‘Add’.
Back on your ‘Projects’ dashboard, you’ll now see two projects – the sample project and the one you’ve just created.
The newly created project can also be seen under ‘Recent Projects’ on the left-hand side menu.
Now, select your new project to start customizing and managing it.
To view a snapshot of activities within this project, click on ‘Dashboard’ at the top.
Next to that, we have ‘Tasks’ where you’ll see the project-specific tasks when you create them.
Notice the other options including Gantt & Reports, Documents, Milestones, Timesheet, Issues, and Users.
Timesheet is where you can review the time spent on tasks and issues, and thus manage it properly.
Also Read: Create FREE Business Emails with Zoho Mail
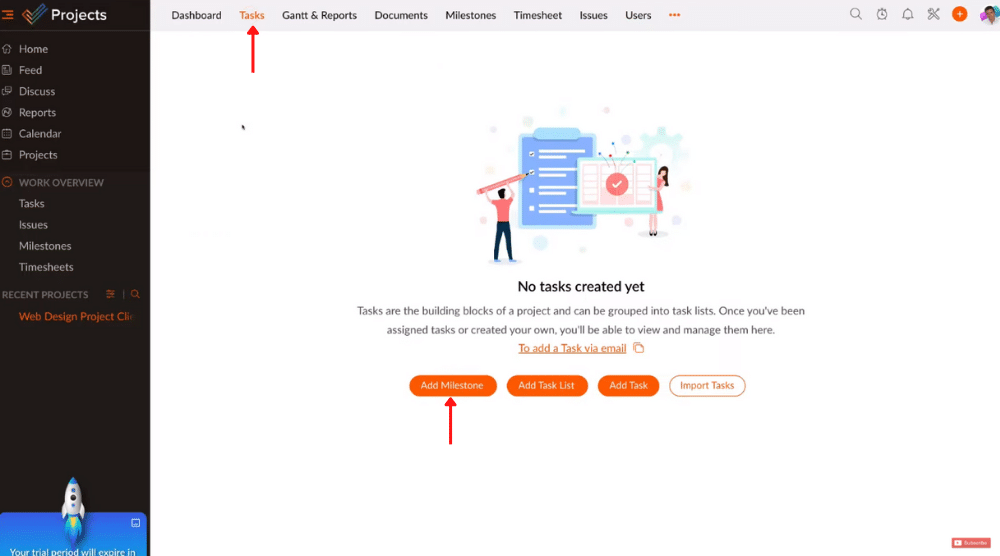
Step 9: Create a Milestone
 To add a milestone:
- Under the newly created project, navigate over to the ‘Tasks’ tab
- Click on ‘Add Milestone’ and fill out the information (refer to the screengrab)
- Hit ‘Add’
Using the same process, you can add as many milestones as you like.
Also Read: Zoho CRM Tutorial for Beginners
Step 10: Create a Task List
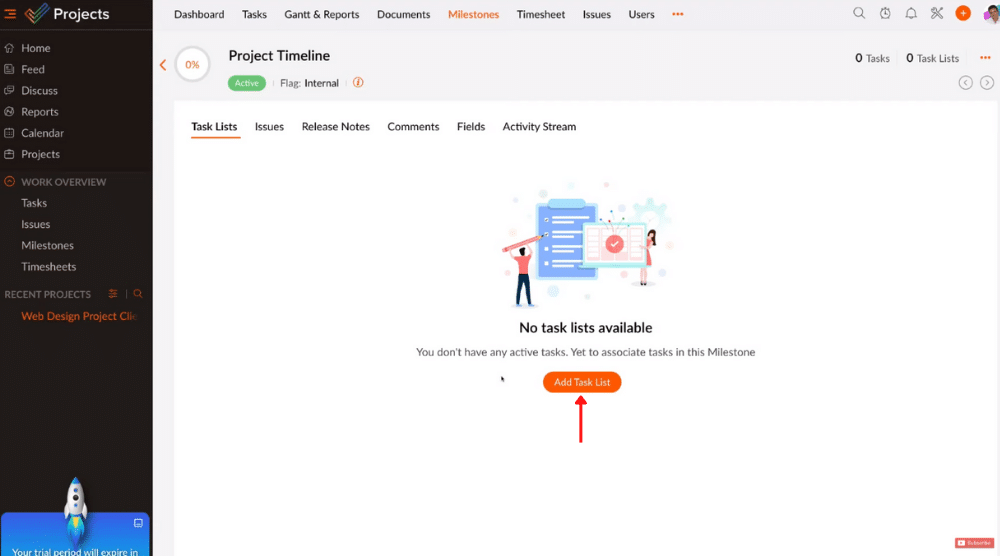 Under the newly created milestone, you can then create a task list.
To do that:
- Select ‘Add Task List’
- Fill in details such as task list name, tags
- Click on ‘Add’
For this Zoho Projects tutorial, we’ll add another Task List using the same process.
Now, click on any of these tasks lists and select ‘Add Task’ to create tasks within them.
For each task, you can also attach relevant files if you like.
Apart from that, you can select the associated team, owner responsible, work hours needed to complete the task, priority, and more.
You may set a reminder, and add a billing type if you like.
If you decide Zoho Projects is not the right tool for you, check out our other tutorials for other leading project management tools for small businesses:
.png)


Comments
Post a Comment