Create A Free Website and Sell Products on Wix Online Store (3 Simple Steps)
Have you been looking for a way to sell your products online completely for free?
Well, you’ve come to the right place!
In this tutorial, we’ll introduce you to Wix and Ecwid, the two platforms you’ll require to start selling online.
Using Wix, you can easily and quickly create an online store for free using an app integration called Ecwid.
Can you sell on Wix for free?
While you can create a free Wix online store, you do need a premium plan to start selling your products online.
However, today I will explain the process that does NOT require you to spend anything! How?
By integrating Ecwid and Wix!
We will explain how to:
1) Create an online store using Ecwid
2) Build a free Wix website
3) Integrate Ecwid with Wix to create a free online store
This tutorial is ideal for beginners who wish to get started with e-commerce completely for free!
Steps to Sell Products on Wix for FREE
Let’s understand how to sell products on Wix for free:
Step 1: Getting Started with Ecwid
The process starts by learning how to create an online store with Ecwid, first.
Using Ecwid, you can upload a maximum of 10 products completely free of cost.
You can sell products on a website that is built within Ecwid.
Or alternatively, you can build a free online store with Ecwid and then integrate it with other website builders like Wix and that is exactly what we are going to show you.
This approach is ideal if you already own a website and intend to sell products through it.
To build a free online store using Ecwid:
Get started with Ecwid for FREE here
*The link above is an affiliate link, which means we will get a commission if you upgrade to a paid plan (with no extra cost to you). This helps support our education-based website and we thank you in advance!
- Visit Ecwid, the official website
- Hit ‘Get Started for Free’ on the home page
- Proceed with signing up for a free Ecwid account (if you don’t have one), or signing in
1.1 Navigating the Ecwid Dashboard (Adding Products)
Once you are inside the Ecwid dashboard, you’ll need to take the following actions:
- Select ‘Catalog’ (see left-hand side menu)
- Click ‘Products’
We’ll now add products to our free online store.
At present, we have three products listed (refer to the screengrab).
To add another one, click on ‘Add New Product’.
1.2 Add Product Details
Now, fill out the product information by:
- Typing in the product name, SKU (optional – stock keeping unit), and weight.
- Uploading images, ideally taken from different camera angles.
- Add product descriptions and pricing details.
Similarly, you can list multiple products (up to 10, for free) on Ecwid.
Since the focus of today’s tutorial is the Ecwid and Wix integration, we won’t cover this part in much detail.
However, you can go ahead and watch this in-depth Ecwid tutorial for beginners to help you get started with Ecwid.
In this Ecwid tutorial we explain:
- How to set up an Ecwid account.
- How to add products to your free online store.
- How to create a website – all through Ecwid.
But for now, we’ll move on to creating a free Wix website using their artificial design intelligence (ADI) technology (more on that later).
Read more: Ecwid Tutorial for Beginners
Step 2: Getting Started with Wix
To build a website using Wix:
Get started with Wix for FREE here
*The link above is an affiliate link, which means we will get a commission if you upgrade to a paid plan (with no extra cost to you). This helps support our education-based website and we thank you in advance!
- Visit Wix, the free website builder.
- Either sign in or sign up to begin website creation depending on whether or not you already have a Wix account. You can sign up to Wix through Facebook or Google.
- When you’re completing the sign-up, make sure you select the type of business website you intend to create (refer to the screengrab). It could be a blog, portfolio, online store, consultant, etc. For this Ecwid and Wix tutorial, let’s go for jewellery Just type in the keyword and select the relevant option from the suggestions.
- Next, you want to name your free online store. It’s possible to change this name later on.
- Select features that you want your Wix website to have. Examples are chat, bookings, forum, online store, forms, etc. For this Ecwid and Wix tutorial, we’ll go for the following features: pricing plans, blog, and an Instagram feed. You can add more features to your site later on.
- Hit ‘Next’
- Wix will now ask if you’ve created a website before. We’ll go for ‘This is my first time’.
2.1 Create a Free Wix Website (ADI)
For Wix to auto-generate a website for you, some more steps are required:
- Click the ‘Start Now’ button. You can now import data from your existing website from Google Business profile (if you have one). Otherwise, you can skip this part.
- Next, under ‘Review and edit your info’, start adding your business info like name, email, address, phone number, and social accounts. Ensure that those details are accurate.
- You can upload a business logo. If you don’t have one, watch this beginner’s tutorial on how to create a business logo for free using a graphic design tool called Canva.
- Now, pick a theme color that best resonates with your brand, which is also changeable later on.
- Based on your preferences recorded by the Wix website builder, it will recommend three homepage designs for you. Click on ‘Use this design’ to select one.
- Add additional web pages to your new Wix website, such as Contact, Policies, About Us, Our Products, etc. These pages can also be added later on.
- Click ‘Edit Site’
Read more: Canva Free Logo Maker
Wix will now instantly generate a free, professional website for you using ADI.
You can now begin customizing each website page that you added in the previous step.
If you want to learn everything about how to use Wix, watch this all-inclusive tutorial.
In that, we show you how to:
- Generate a website using Wix ADI.
- How to customize a website using Wix Editor.
Notice that on your Wix website, you have the ‘Shop’ option on the primary menu.
The reason why it’s here is that we selected ‘Jewelry Store’ earlier to describe our website.
This Wix template comes with an online store.
However, this ‘shop feature’ doesn’t work under the free plan – unless you integrate Ecwid and Wix (the final part of our tutorial).
Read more: How To Make A FREE Website With Wix
2.2 Remove Wix Online Store
Before integrating Ecwid and Wix, we’d first have to remove the built-in online store from Wix.
To do that:
- Navigate over to ‘Page’ in the upper-left corner and click on the drop-down.
- Next to ‘Shop’, clear on the gear icon.
- Click ‘Delete’.
- Confirm the deletion.
You no longer have ‘Shop’ on the menu.
Step 3: Enable the Wix Editor
We now need to add the Ecwid online store to start selling products for free on Wix.
For that:
- Navigate over to ‘Site’ (refer to the screengrab).
- Click on ‘Go to Editor’.
- Select ‘Switch to Editor’.
Wix Editor offers you more design freedom, allowing you to customize your website exactly the way you like.
On the other hand, ADI is structured and offers very limited website customization options (However, ideal for beginners).
3.1 Add the Ecwid App
After the Wix Editor has loaded:
- Point your cursor to ‘Add Apps’ on the left-hand side and click on it.
- Select ‘Online Store’ under the ‘Recommend for You’ section.
- Search for Ecwid (from the search bar provided) and locate ‘Online Store’.
- Click ‘Add to Site’ and ‘Save Changes’.
Wix will take a moment to integrate your Ecwid online store with your website.
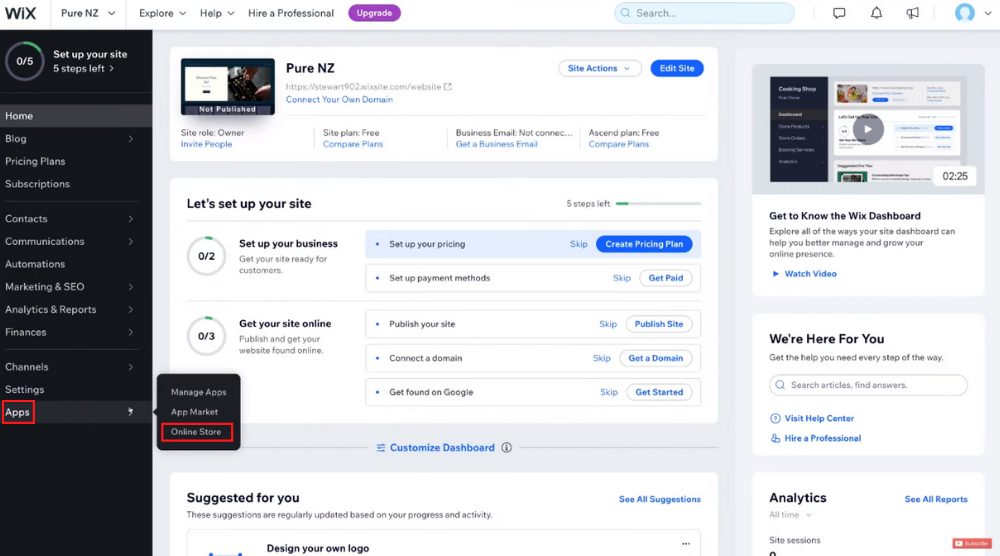
Navigate over to ‘Site’ in the top-left corner and select ‘My Dashboard’.
Now, follow these steps:
- On the dashboard, click on ‘Apps’ from the left-hand menu.
- Select ‘Online Store’ from the options.
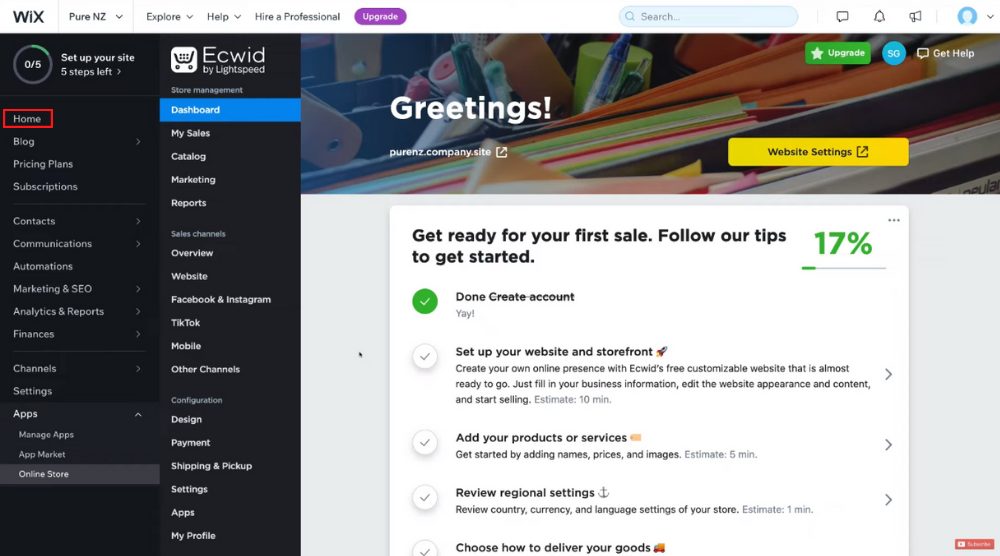
- Click on ‘I already have an Ecwid account’ .
You’ve successfully connected Ecwid and Wix!
From your Wix dashboard, you can directly manage your Ecwid online store as well.(refer to the screengrab)
To see your online store:
- Click on ‘Home’ (on the far-left).
- Select ‘Edit Site’.
On our primary menu, we now have the ‘Online Store’ option.
The store consists of the products you added while creating the Ecwid store.
After the integration of Ecwid and Wix, the products are now displayed on Wix.
Click ‘Preview’ to view what your store will look like for the end users’.
Hit ‘Publish’ (see top-right corner) when you’re ready to go live!
Tap on your products to see their individual details.
Unfortunately, with the free plan, your online store comes with Wix branding, which looks quite unprofessional.
We recommend upgrading to the Combo plan.
See more details below.
Also read: BEST Website Builder for Online Store

.png)


Comments
Post a Comment